Kubernetes on AWS with Cloud Block Store

Only a slight nudge at from @CodyHosterman to put this post together.

Kubernetes deployed into AWS is a method many organizations are using to get into using K8s. Whether you deploy K8s with Kubeadm, Kops, Kubespray, Rancher, WeaveWorks, OpenShift, etc the next big question is how do I do persistent volumes? While EBS has StorageClass integrations you may be interesting in getting better efficiency and reliability than traditional block in the cloud. That is one of the great uses of Cloud Block Store. Highly efficient and highly reliable storage built for AWS with the same experience as the on prem FlashArray. By utilizing Pure Service Orchestrator’s helm chart or operator you can now take advantage of Container Storage as a Service in the cloud. Are you using Kubernetes in AWS on EC2 and have questions about how to take advantage of Cloud Block Store? Please ask me here in the comments or @jon_2vcps on twitter.

  1. Persistent Volume Claims may will not always be 100% full. Cloud Block Store is Deduped, Compressed and Thin. Don’t pay for 100% of a TB if it is only 1% full. I do not want to be in the business of keeping developers from getting the resources they need, but I also do not want to be paying for when they over-estimate.
  2. Migrate data from on prem volumes such as K8s PVC, VMware vVols, Native physical volumes into the cloud and attach them to your Kubernetes environment. See the youtube demo below for an example. What we are seeing in the demo is creating an app in Kubernetes on prem, loading it with some data (photos), replicating that application to the AWS cloud and using Pure Service Orchestrator to attach the data to the K8s orchestrated application using Cloud Block Store. This is my re-working of Simon’s tech preview demo from the original launch of Cloud Block Store last November.

3. Simple. Make storage simple. One common tweet I see on twitter from the Kubernetes detractors is how complicated Kubernetes can be. Pure Service Orchestrator makes the storage layer amazingly simple. A single command line to install or upgrade. Pooling across multiple devices.

Get Started today:
Below I will include some links on the different installs of PSO. Now don’t let the choices scare you. Container Storage Interface or CSI is the newest API for common interaction with all storage providers. While flexvol was the original storage solution it makes sense to move forward with CSI. This is very true for newer versions of kubernetes that include CSI by default. So if you are starting to use K8s for the first time today or your cluster is K8s 1.11 we have you covered. Use the links below to see the install process and prerequisites for PSO.

FlexVol Driver:
Pure Service Orchestrator Helm Chart
Pure Service Orchestrator Operator

CSI Driver:
Pure Service Orchestrator CSI Helm
Pure Service Orchestrator CSI Operator

Talking Pure and K8s on the Virtually Speaking Podcast at #PureAccelerate

Migrate Persistent Data into PKS with Pure vVols

While I discussed in my VMworld session this week some of the architectural decisions to be made while deploying PKS on vSphere my demo revolved around once it is up and running how to move existing data into PKS.

First, using the Pure FlashArray and vVols we are able to automate that process and quickly move data from another k8s cluster into PKS. It is not limited to that but this is the use case I started with.

Part 1 of the demo shows taking the persistent data from a deployment on and cloning it over the vVol that is created by using the vSphere Cloud Provider with PKS. vVols are particularly important because they keep the data in a native format and make copy/replication and snapshotting much easier.

Part 2 is the same process just scripted using Python and Ansible.

Demo Part 1 – Manual process of migrating data into PKS

Demo Part 2 – Using Python and Ansible to migrate data into PKS

How to automate the Migration with some Python and Ansible

The code I used is available from code.purestorage.com. Which also links to the GitHub repo https://github.com/PureStorage-OpenConnect/k8s4vvols

They let me on a stage. Again. 🙂

Use PKS Enterprise on VMware SDDC and Pure Storage

Use PKS Enterprise on VMware SDDC and Pure Storage

Pivotal Container Services (PKS) provides a deeply integrated Kubernetes (k8s) architecture for the VMware SDDC. It is a joint engineering project from VMware and Pivotal. In my conversations with Pure Storage customers or potential customers around Kubernetes I often get asked about how Pure Storage can help a PKS Enterprise environment. The good news is there is a very easy path to utilizing k8s with Pure + VMware + PKS.

The Architecture

Using Pure with PKS is actually very straight forward. Since Pure FlashArray is already leading choice for all VMware environments it is not anything out of the ordinary to support PKS. 

Understanding the underlying technology that integrates PKS into VMware you may soon realize that highly reliable, stateless and shared storage is the best choice when deploying PKS. 

The choice between drivers (shown in the graphic above) to deliver the Storage is up to you. The vSphere Cloud Provider provides automated creation and management of the virtual disks presented to containers in PKS. This supports the use of vVols and enables great possibilities for your PKS environment.  Pure Service Orchestrator utilizes a direct connection to Pure Storage FlashArrays, FlashBlades and Cloud Block Stores. It is installed with a single Helm command or Kubernetes Operator. It includes Smart Provisioning in order to place volumes on the most optimal storage device in your fleet.

The choice of which tool will be dictated by your workload. It is not an exclusive choice either. It is easy to do both. After VMworld I hope to publish the details on how to install PSO on PKS. If you have really good github search foo you may be able to find the bosh deployment.

Highly Reliable

Pure Storage has measured 6×9’s of uptime across its customer base. Many storage solutions for container environments will require hours of planning and weeks of proper implementation to provide high availability. Do not spend time re-architecting your storage infrastructure for PKS. Spend your time delivering k8s to your customers so they can deliver innovation for your business.  Use the Pure Storage devices you already have. You may not even need a whole new dedicated array (don’t tell sales I said that). 

Stateless Arrays for Stateful Data

Migrating data should be eliminated from your daily tasks. As FlashArrays move further into the future where data always stays in place. The ability to keep the data in place for multiple hardware generations is a proven benefit of Pure. Migrating persistent storage in k8s even on VMware is a non-trivial task. Depending on your scale this could take weeks of planning and careful flawless execution to accomplish non-disruptively. The underlying hardware should not be a concern for delivering applications. Pure Storage has made this a reality since the FlashArray debut 7 years ago.

Shared Storage

Delivering highly reliable data across multiple PKS and vSphere clusters, allowing applications to failover if the compute in an availability zone becomes unavailable, is key to delivering a cloud experience for your k8s rollout. While the Pure sales teams would gladly help you acquire a FlashArray per vSphere cluster hosting PKS this is simply un-needed for nearly all situations. Especially as you start on your Kubernetes journey.

But Why PURE?

Simple; vVols on the FlashArray combined with the PKS integration with vSphere enables mobility of data and freedom unavailable on a legacy datastore. Have a group that rolled their own k8s? FlashArray can clone their persistent data instantly into PKS using vVols. Need to copy data from a bare metal (non-VM) k8s cluster to PKS? Pure vVols makes this possible. Have multiple k8s clusters within PKS today that require the same data for test/dev/prod Pure Storage enables this nearly instantly. Pure Storage FlashArray Snapshots and Clones move at the speed of an API call from any of our SDK’s from Python to Powershell to Ansible to Terraform and more to give you an easy way to fit Pure Storage into your Infrastructure as Code tools. 

You can probably spend the next 5 hours reading blogs and papers of all the other benefits of Pure Storage and they all apply to your PKS on vSphere environment but I wanted to provide a few examples directly related to operating PKS on Pure.

VMworld 2019 Session

In my session for VMworld in San Francisco I will demonstrate how Pure Storage is able to instantly migrate persistent volumes from “other” k8s clusters to PKS. Make sure you make it to this session if you considering PKS.

PSO and “Failed to Log in to Any iSCSI Targets.”

So I create and destroy Kubernetes clusters on vSphere on a pretty regular basis. Some I create with Terraform and Ansible. Some I use PKS. I have a plumbing test for Pure Service Orchestrator that mounts a single volume to a pod on each node.

Every once in a while I get an error like this, on just one node:

Failed to log in to any iSCSI targets! Will not be able to attach volume

In order to make sure it isn’t PSO with the error and it shouldn’t be since the other nodes are working. Run this command:

iscsiadm -m discovery -t st -p 192.168.230.24
iscsiadm: Could not stat /etc/iscsi/nodes//,3260,-1/default to delete node: No such file or directory
 iscsiadm: Could not add/update [tcp:[hw=,ip=,net_if=,iscsi_if=default] 192.168.230.24,3260,1 iqn.2010-06.com.purestorage:flasharray.4ca976f28eb0d479]
 iscsiadm: Could not stat /etc/iscsi/nodes//,3260,-1/default to delete node: No such file or directory
 iscsiadm: Could not add/update [tcp:[hw=,ip=,net_if=,iscsi_if=default] 192.168.230.25,3260,1 iqn.2010-06.com.purestorage:flasharray.4ca976f28eb0d479]
 iscsiadm: Could not stat /etc/iscsi/nodes//,3260,-1/default to delete node: No such file or directory
 iscsiadm: Could not add/update [tcp:[hw=,ip=,net_if=,iscsi_if=default] 192.168.230.26,3260,1 iqn.2010-06.com.purestorage:flasharray.4ca976f28eb0d479]
 iscsiadm: Could not stat /etc/iscsi/nodes//,3260,-1/default to delete node: No such file or directory
 iscsiadm: Could not add/update [tcp:[hw=,ip=,net_if=,iscsi_if=default] 192.168.230.27,3260,1 iqn.2010-06.com.purestorage:flasharray.4ca976f28eb0d479]
 192.168.230.24:3260,1 iqn.2010-06.com.purestorage:flasharray.4ca976f28eb0d479
 192.168.230.25:3260,1 iqn.2010-06.com.purestorage:flasharray.4ca976f28eb0d479
 192.168.230.26:3260,1 iqn.2010-06.com.purestorage:flasharray.4ca976f28eb0d479
 192.168.230.27:3260,1 iqn.2010-06.com.purestorage:flasharray.4ca976f28eb0d479

Now I that isn’t what should be the result. So I thought at first to restart iscsi and that didn’t help. Then I thought, well this is a lab so lets just…

#cd /etc/iscsi
#rm -r nodes

Do not try this if you have other iSCSI targets for other storage. Not sure you will be happy. At first, I thought I should stop iSCSI before doing this. It doesn’t seem to have any effect. Now every node is able to mount and start the pod. Pure Service Orchestrator is trying to mount that volume over and over so it didn’t take long to see everything showing the way I wanted.

NAME                                        READY   STATUS    RESTARTS   AGE
 pure-flex-4zlcq                             1/1     Running   0          12m
 pure-flex-7stfb                             1/1     Running   0          12m
 pure-flex-g2kt2                             1/1     Running   0          12m
 pure-flex-jg5cz                             1/1     Running   0          12m
 pure-flex-n8wkw                             1/1     Running   0          6m34s
 pure-flex-rtsv7                             1/1     Running   0          12m
 pure-flex-vtph2                             1/1     Running   0          12m
 pure-flex-w8x22                             1/1     Running   0          12m
 pure-flex-wqr9k                             1/1     Running   0          12m
 pure-flex-xwbww                             1/1     Running   0          12m
 pure-provisioner-9c8dc9f79-xrq6d            1/1     Running   1          12m
 redis-master-demolocal-1-779f74876c-9k24t    1/1     Running   0          12m
 redis-master-demolocal-10-6695b56f47-zgqc7   1/1     Running   0          12m
 redis-master-demolocal-2-778666b57-5xdh8     1/1     Running   0          6m3s
 redis-master-demolocal-3-84848dfb87-fhj6n    1/1     Running   0          12m
 redis-master-demolocal-4-7c9dfdffb9-6cjv5    1/1     Running   0          12m
 redis-master-demolocal-5-65b555fc79-jjdkl    1/1     Running   0          12m
 redis-master-demolocal-6-6d495bfdf-cb5r2     1/1     Running   0          12m
 redis-master-demolocal-7-5c5db655-fx2qd      1/1     Running   0          12m
 redis-master-demolocal-8-74bc65b8d9-2bt8h    1/1     Running   0          12m
 redis-master-demolocal-9-65dd54c587-zb9p2    1/1     Running   0          12m

Namespace Issues when Removing CRD/Operators

With the latest release of Pure Service Orchestrator, we added support for a non-Helm installation for environments that do not allow Helm. This new method uses an Operator to setup and install PSO. The result is the same exact functionality but uses a security model more agreeable to some K8s distro vendors.

I do live demos of PSO a handful of times a day. Even though I use Terraform and Ansible to automate the creation of my lab K8s clusters I don’t want to do this many times a day. I usually just tear down PSO and leave my cluster ready for the next demo.

Removing the CRD and the Namespace created when installing the Operator has a couple of issues. One small issue is the Operator method creates a new namespace “pso-operator”. This is the default name, and you can choose your own namespace name during install time. I often choose “pso” for simplicity. As we have discovered, deleting a namespace that had a CRD installed into hangs in the status “Terminating”, for like, forever. FOR-EV-ER. This seems to be an issue dating back quite a ways in K8s land.

https://github.com/kubernetes/kubernetes/issues/60807#issuecomment-448120772

via GIPHY

From a couple of GitHub issues and the help of Simon “I don’t do the twitter” Dodsley This is the process for deleting the CRD first and the Namespace. This method keeps the namespace form hanging in the state “Terminating”.

# Removing the pso-operator
kubectl delete all --all -n pso-operator

# If you haven't don't it already don't delete the namespace yet.
kubectl get ns
NAME          STATUS   AGE
default       Active   2d21h
kube-public   Active   2d21h
kube-system   Active   2d21h
pso-operator  Active   14h

kubectl get crd
NAME                         CREATED AT
psoplugins.purestorage.com   2019-04-17T01:37:31Z

# ok so...
kubectl delete crd psoplugins.purestorage.com
customresourcedefinition.apiextensions.k8s.io "psoplugins.purestorage.com" deleted

# does it hang? yeah it does
^C
# stuck terminating? 
kubectl describe crd psoplugins.purestorage.com
# snipping non-relevant output
...
Conditions:
    Last Transition Time:  2019-04-17T01:37:31Z
    Message:               no conflicts found
    Reason:                NoConflicts
    Status:                True
    Type:                  NamesAccepted
    Last Transition Time:  <nil>
    Message:               the initial names have been accepted
    Reason:                InitialNamesAccepted
    Status:                True
    Type:                  Established
    Last Transition Time:  2019-04-18T13:54:36Z
    Message:               CustomResource deletion is in progress
    Reason:                InstanceDeletionInProgress
    Status:                True
    Type:                  Terminating
  Stored Versions:
    v1

# Run this command to allow it to delete
kubectl patch crd/psoplugins.purestorage.com -p '{"metadata":{"finalizers":[]}}' --type=merge
customresourcedefinition.apiextensions.k8s.io/psoplugins.purestorage.com patched

# Re-run the crd delete
kubectl delete crd psoplugins.purestorage.com

# Confirm it is gone
kubectl get crd
No resources found.

# Remove the Namespace
kubectl delete ns pso-operator
namespace "pso-operator" deleted

#Verify removal
kubectl get ns
NAME          STATUS   AGE
default       Active   2d21h
kube-public   Active   2d21h
kube-system   Active   2d21h

If you sort of ignored my warning above and tried to remove the namespace BEFORE successfully removing the CRD follow the following procedure.

Namespace Removal

# Find that pesky 'Terminating' namespace
kubectl get ns
NAME           STATUS        AGE
default        Active        2d20h
kube-public    Active        2d20h
kube-system    Active        2d20h
pso            Active        13h
pso-operator   Terminating   35h

kubectl cluster-info
# run the kube-proxy
kubectl proxy &

# output the namespace to json
kubectl get namespace pso-operator -o json >tmp.json

# Edit the tmp.json to remove the finalizer the spec: should look like this:
"spec": {
        "finalizers": [
        ]
    },

# Now send that tmp.json to the API server
curl -k -H "Content-Type: application/json" -X PUT --data-binary @tmp.json http://127.0.0.1:8001/api/v1/namespaces/pso-operator/finalize

# Check your namespaces
kubectl get ns
NAME          STATUS   AGE
default       Active   2d20h
kube-public   Active   2d20h
kube-system   Active   2d20h
pso           Active   13h

# disable the kube-proxy, bring it back to the foreground and ctrl-C

fg
^C

Storage Quotas in Kubernetes

One thing since we released Pure Service Orchestrator I get asked is, “How do we control how much developer/user can deploy?”

I played around with some of the settings from the K8s documentation for quotas and limits. I uploaded these into my gists on GitHub.

git clone git@gist.github.com:d0fba9495975c29896b98531b04badfd.git
#create the namespace as a cluster-admin
kubectl create -f dev-ns.yaml
#create the quota in that namespace
kubectl -n development create -f storage-quota.yaml
#or if you want to create CPU and Memory and other quotas too
kubectl -n development create -f quota.yaml

This allows users in that namespace to be limitted to a certain number of Persistent Volume Claims (PVC) and/or total requested storage. Both can be useful in scenarios where you don’t want someone to create 10,000 1Gi volumes on an array or create one giant 100Ti volume. 

Credit to dilbert.com When I searched for quotas on the internet this made me laugh. I work with salespeople a lot.


Getting Started with Pure Service Orchestrator and Helm

Why Pure Service Orchestrator?

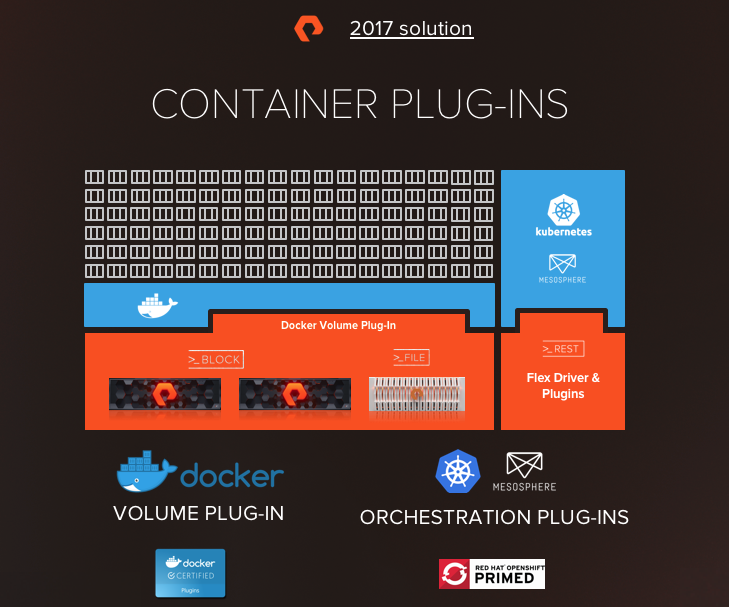
At Pure we have been working hard to develop a way to provide a persistent data layer that is able to meet the expectations of our customers for ease of use and simplicity.  The first iteration of this was the release as the Docker and Kubernetes Plugins.

The plugins provided automated storage provisioning. Which solved a portion of the problem.  All the while, we were working on the service that resided within those plugins. A service that would allow us to bring together managing many arrays. Both block and file.

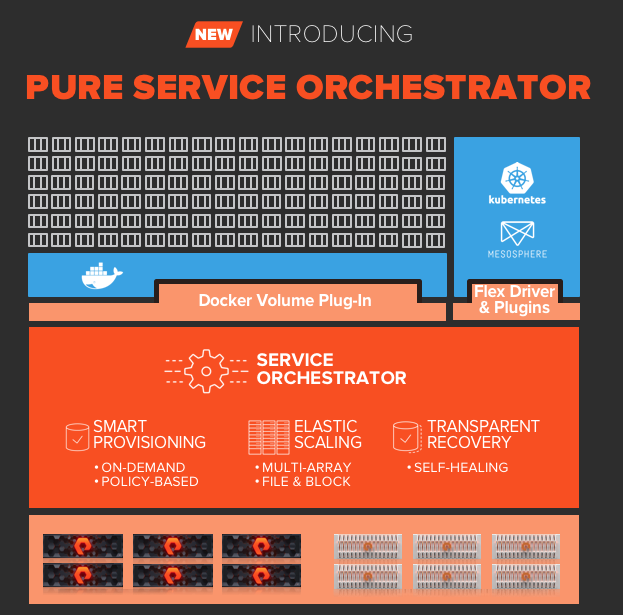
The new Pure Service Orchestrator will allow smart provisioning over many arrays. On-demand persistent storage for developers placed on the best array or adhering to your policies based on labels.

To install you can use the traditional shell script as described in the readme file here.

The second way that may fit into your own software deployment strategy is using Helm. Since using Helm provides a very quick and simple way to install and it may be new to you the rest of this post will be how to get started with PSO using Helm.

Installing Helm

Please be sure to install Helm using the correct RBAC intructions.

I describe the process in my blog here.

http://54.88.246.86/2018/03/27/getting-started-with-helm-for-k8s/ 

Also, get acquainted with the official Helm documentation at the following site:

https://docs.helm.sh/using_helm/

Once Helm is fully functioning with your Kubernetes cluster run the following commands to setup and Pure Storage Helm repo:

helm repo add pure https://purestorage.github.io/helm-charts
helm repo update
helm search pure-k8s-plugin

Additionally, you need to create a YAML file with the following formate and contents:

arrays:
  FlashArrays:
    - MgmtEndPoint: "1.2.3.4"
      APIToken: "a526a4c6-18b0-a8c9-1afa-3499293574bb"
      Labels:
        rack: "22"
        env: "prod"
    - MgmtEndPoint: "1.2.3.5"
      APIToken: "b526a4c6-18b0-a8c9-1afa-3499293574bb"
  FlashBlades:
    - MgmtEndPoint: "1.2.3.6"
      APIToken: "T-c4925090-c9bf-4033-8537-d24ee5669135"
      NFSEndPoint: "1.2.3.7"
      Labels:
        rack: "7b"
        env: "dev"
    - MgmtEndPoint: "1.2.3.8"
      APIToken: "T-d4925090-c9bf-4033-8537-d24ee5669135"
      NFSEndPoint: "1.2.3.9"
      Labels:
        rack: "6a"

You can run a dry run of the installation if you want to see the output but not change anything on your cluster. It is important to remember the path to the yaml file you created above.

helm install --name pure-storage-driver pure/pure-k8s-plugin -f <your_own_dir>/yourvalues.yaml --dry-run --debug

If you are satisfied with the output of the dry run you can run the install now.

helm install --name pure-storage-driver pure/pure-k8s-plugin -f <your_own_dir>/yourvalues.yaml

Please check the GitHub page hosting the Pure Storage repo for more detail.

https://github.com/purestorage/helm-charts/tree/master/pure-k8s-plugin#how-to-install

Setting the Default StorageClass

Since we do not want to assume you only have Pure Storage in you environment we do not force ‘pure’ as the default StorageClass in Kubernetes.

If you already installed the plugin via helm and need to set the default class to pure run this command.

kubectl patch storageclass pure -p '{"metadata": {"annotations":{"storageclass.kubernetes.io/is-default-class":"true"}}}'

If you have another storage class set to default and you wish to change it to Pure you must first remove the default tag from the other StorageClass and then run the command above. Having two defaults will produce undesired results.  To remove the default tag run this command.

kubectl patch storageclass <your-class-name> -p '{"metadata": {"annotations":{"storageclass.kubernetes.io/is-default-class":"false"}}}'

Read more about these commands from the K8s documentation.

https://kubernetes.io/docs/tasks/administer-cluster/change-default-storage-class/

Demo

Maybe you are a visual learner check out these two demos showing the Helm installation in action.

Updating your Array information

If you need to add a new FlashArray or FlashBlade simply add the information to your YAML file and update via Helm. You may edit the config map within Kubernetes and there are good reasons to do it that way, but for simplicity we will stick to using helm for changes to the array info YAML file. Once your file contains the new array or label run the following command.

helm upgrade pure-storage-driver pure/pure-k8s-plugin -f <your_own_dir>/yourvalues.yaml --set ...

Upgrading using Helm

With the same general process you can use the following command and update the version of Pure Service Orchestrator.

helm upgrade pure-storage-driver pure/pure-k8s-plugin -f <your_own_dir>/yourvalues.yaml --version <target version>

Upgrading from the legacy plugin to the Helm version

Follow the instructions here:

https://github.com/purestorage/helm-charts/tree/master/pure-k8s-plugin#how-to-upgrade-from-the-legacy-installation-to-helm-version

There are a few platform specific considerations you should make if you are using any of the following.

  1. Containerized Kubelet (Some flavors of K8s do this, Rancher and Openshift are two).
  2. CentOS/RHEL Atomic Linux
  3. CoreOS
  4. OpenShift
  5. OpenShift Containerized Deployment

Be certain to read through the notes if you use any of these platform versions.

https://github.com/purestorage/helm-charts/tree/master/pure-k8s-plugin#how-to-upgrade-from-the-legacy-installation-to-helm-version

https://github.com/purestorage/helm-charts/tree/master/pure-k8s-plugin#platform-specific-considerations

Creating a Helm Repo with Github

Next step in learning helm is being able to take an existing helm package and put it in your own repo.

There are ways to do this with github pages. I don’t really want mess withthat right now, how can I use a Github repo to host my changes to the deployment?

For installing helm and an additional demo please see part 1 of this series.

http://54.88.246.86/2018/03/27/getting-started-with-helm-for-k8s/

Continue reading “Creating a Helm Repo with Github”

Getting Started with Helm for K8s

Over the last few weeks I was setting up Kubernetes in the lab. One thing I quickly learned was managing and editing yaml files for deployments, services and persistent volume claims became confusing and hard. Even when I had things commited in github sometimes I would make edits then not push them then rebuild my K8s cluster.

The last straw was when 2 of our Pure developers said that editing yaml in vi wasn’t very cool and to start using helm.

Needless to say that was good advice. I still have to remember to push my repos to github. Now my demostration applications are more “cloud native”. I can create and edit them in one environment and use helm install in another and have it just work.

Continue reading “Getting Started with Helm for K8s”

Using Snapshots with the Pure Storage Plugin for Kubernetes

One request from customers is not only provision persistent storage for Kubernetes but also integrate into workflows that may need to snap and copy the data for different environments. Much like we do this with powershell or python for SQL and Oracle environments to accelerate development or QA. Pure has enabled snapshots using the Pure Provisioner as part of our Kubernetes Plugin.

In this demo I am showing how I can take a users data directory for JupyterHub and clone it for another user to take advantage of all the benefits of Pure’s snapshots and clones. You instantly get access to a copy of the dataset. The dataset doesn’t take up room on the backend storage. Only globally unique changes will grow the volume. In this use case the Data Science team will see increases in productivity as they are not waiting for data to download from the cloud or copy from another place on the array.

The command to run the snap using kubectl is below:

kubectl exec <pure provisioner pod name> -- snapshot create -n <namespace> <pvc-claim-name>